

In this step-by-step guide, we will show you how to sew buttons using a mini sewing kit. This guide is perfect for beginners or anyone looking to refresh their sewing skills. By following our easy-to-follow instructions, you’ll be able to master the art of sewing buttons in no time!
Must-Have Sewing Essentials


Easy Guide to Sewing a Button: Must-Have Basics for Beginners!
Gather the necessary materials
Before you begin, gather the necessary materials for your sewing project. Make sure you have a mini sewing kit handy, as it will contain most of the tools you need. In addition to the kit, you’ll also need a button that you want to sew onto your fabric. Select a needle that is appropriate for the size of the buttonholes and the thread you will be using. Make sure to choose a needle with a sharp point to make sewing easier. Lastly, ensure you have matching thread that will complement the color of your fabric and button. If you have a small pair of scissors, keep them nearby as they will help you trim the thread. A thimble can also be helpful to protect your finger while pushing the needle through thick fabric.
To summarize, gather a mini sewing kit, a button, a needle, matching thread, a small pair of scissors, and a thimble (optional). These materials will provide you with the essentials for your sewing project.


Prepare the thread
To prepare the thread for sewing, start by cutting a length of thread that is double the distance from the button to the fabric, adding a little extra. This ensures that you have enough thread to sew the button securely. Next, take the thread and insert it through the eye of the needle. Make sure the thread is pulled through about halfway, leaving an equal length of thread on each side of the needle. This will give you enough thread to work with.
Once the thread is threaded through the needle, take both ends of the thread and hold them together. Tie a knot at the end of the thread, ensuring that it is secure and won’t easily come undone while you’re sewing. To tie the knot, simply make a loop with the thread and pass the ends through the loop twice, pulling it tightly to create a knot. With the knot securely tied, your thread is now ready for sewing the button onto the fabric.
To place the button in the desired location on the fabric, start by examining your garment or project. If there are existing buttonholes, align the button accordingly. This ensures that the button will fit properly and secure the fabric when fastened. For example, if you are working on a shirt, check for the buttonhole markings and position the button in line with them. This will ensure that the button sits centrally and aligns with the buttonhole when fastened.
If there are no existing buttonholes, you have the freedom to determine the best position for the button based on your garment or project. Consider factors such as practicality and aesthetics. For instance, when adding a button to a coat, place it at a position that allows the coat to close securely without creating any pulling or gaps in the fabric. Additionally, consider the overall design and style of your garment or project. Placing the button at a strategic point, such as along a seam or on a patterned fabric, can enhance the visual appeal. Experiment with different placements to find the best position that meets both functional and aesthetic requirements.
Start sewing
To sew a button onto fabric, start by inserting the needle from the backside of the fabric and through one of the buttonholes. For example, if you’re sewing a button onto a shirt, insert the needle through one of the buttonholes on the shirt. Pull the thread until the knot is snug against the fabric, ensuring that the button is secure.
Next, sew a series of small stitches through the buttonholes. For instance, using a back and forth motion, pass the needle through the fabric, going back and forth between the buttonholes. This will create a secure attachment for the button. Repeat this process several times to ensure the button is securely fastened.
Remember, the key is to make small, even stitches to keep the button firmly in place. By following these steps, you’ll be able to sew a button onto any fabric easily and securely.
Secure the thread
To secure the thread after sewing enough stitches to securely hold the button, follow these steps:
- Bring the needle to the backside of the fabric.
- Loop the thread around a few stitches on the backside.
- Pull the thread snugly to ensure a tight knot.
- Tie a knot by looping the thread through the loop created.
- Repeat the previous step to create a double knot for added security.
- Trim any excess thread close to the knot, ensuring it won’t come undone.
By following these simple steps, you can ensure that your button stays securely in place. Remember to practice these techniques to improve your sewing skills and create long-lasting results. Happy sewing!
Wrap it up!
In conclusion, sewing buttons with a mini sewing kit is a handy skill to have. By following the steps and tips mentioned in this blog post, you can easily and efficiently sew buttons onto your garments or accessories. Remember to practice and have fun with it, exploring different thread colors and button styles to add a personal touch to your creations. Happy sewing!
Gathering Your Supplies


Mastering the basics
Step-by-Step Guide to Make the Most of Your Mini Sewing Kit
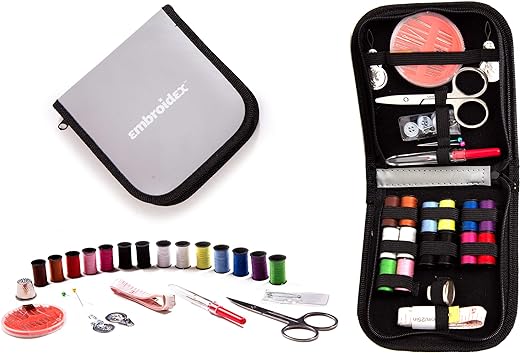
- Familiarize yourself with the contents: Take a look at all the items in your mini sewing kit. Typically, it will include essentials like different colored threads, a pair of scissors, needles, pins, and a small measuring tape
- Thread the needle: Start by selecting the color thread you want to use. Cut a piece of thread about 18 inches long and insert one end through the eye of the needle. Pull the thread through until you have equal lengths on both sides
- Practice basic stitches: Begin with simple stitches like the running stitch or the backstitch. To do a running stitch, push the needle through the fabric from one side to the other, leaving a small gap between each stitch. For a backstitch, push the needle through the fabric, then bring it back to the starting point, creating a continuous line of stitches
- Repair a button: Buttons are one of the most common things that need fixing. To sew a button, thread your needle, then bring it up through one of the buttonholes and down through the opposite hole. Continue sewing back and forth a few times, ensuring the button is securely attached
- Hemming basics: Hemming is useful for shortening pants or skirts. Fold the fabric over to the desired length, then secure it in place with pins. Use a running stitch to sew along the folded edge, making sure to catch both layers of fabric. Knot the thread at the end to secure the hem
- Remember, practice makes perfect, so don’t be afraid to experiment and try different techniques using your mini sewing kit. Happy sewing!
Frequently Asked Questions about our Mini Sewing Kit
How do I use a mini sewing kit to fix a small tear or hole in clothing?
To use a mini sewing kit to fix a small tear or hole in clothing, you will need a few supplies and follow these steps:
- Gather your supplies: mini sewing kit, needle, thread, scissors, and a small piece of fabric that matches your clothing.
- Start by trimming any loose threads around the tear or hole. This will ensure a clean and smooth repair.
- Thread your needle with a suitable thread color. If you don’t have an exact match, choose a color that closely resembles your clothing.
- Begin sewing by inserting the needle through the fabric from the inside, pulling it all the way through until the knot catches.
- Using small, even stitches, sew along the edge of the tear, making sure to secure the fabric together. If the hole is larger, you can sew a running stitch across the hole to close it.
- Once you reach the end, tie a knot at the backside of the fabric to secure the thread.
- If the tear or hole is in a high-stress area, such as a seam or pocket, reinforce the repair by sewing a small patch of fabric on the inside of the garment. Cut a piece of fabric slightly larger than the damaged area, place it behind the tear, and sew around the edges to attach it.
- Finally, trim any excess thread and inspect the repair. If necessary, iron the repaired area to make it blend in better with the rest of the fabric.
Can you suggest a good brand or type of mini sewing kit for beginners?
Certainly! One popular and highly recommended brand for mini sewing kits for beginners is the “Singer Sew-Quik” kit. It provides all the essential tools and supplies needed to get started with basic sewing projects. Another great option is the “Dritz St. Jane Sewing Basket Kit,” which not only includes a mini sewing kit but also comes with a handy storage basket to keep your supplies organized. Both of these brands offer reliable and good-quality products that are perfect for beginners. Happy sewing!
Could you recommend a good brand of mini sewing kits?
Sure! A popular and highly recommended brand of mini sewing kits is ‘Singer’. They offer a variety of kits that come with all the essential tools for sewing on buttons and making small repairs. Another good option is ‘Dritz’, which also offers quality mini sewing kits.
Are there any advanced techniques for sewing buttons that can make them extra secure?
Yes, there are a few advanced techniques you can try to make your buttons extra secure. One method is to create a shank by placing a small button or a stacked couple of stitches underneath the button before securing it in place. This creates a small loop that allows for extra movement and durability. Another technique is to use a double thread by threading the needle with both ends of the thread, which adds strength to the sewing.
I once sewed a button on backwards by accident. It was such a hassle to fix. Any tips for avoiding that mistake?
To avoid sewing buttons on backwards, one helpful tip is to mark the top side of the button with a small dot or a piece of tape before you start sewing. This way, you can easily keep track of which side should face up. It’s also a good idea to double-check the position of the button before starting to sew, just to be sure.
I always struggle with threading the needle. Any tips on making it easier?
I followed the guide and successfully sewed on a button! Thank you for the clear instructions.
You’re welcome! I’m glad the guide was helpful to you. Sewing on buttons can be a useful skill to have, and it’s great to hear that you were able to achieve success.
One tip for threading the needle is to wet the end of the thread slightly before trying to thread it. This can help stiffen the fibers and make it easier to guide through the needle’s eye. You can also try using a needle threader tool, which can make the process much simpler.
I’m having trouble securing the thread at the end. It keeps coming undone. Any suggestions?
If you’re having trouble securing the thread, one tip is to make a few small backstitches at the end. Instead of just one stitch, make a few more stitches in the same spot to reinforce the thread. You can also tie a small knot at the back of the fabric to secure the thread even further. Experiment with different techniques to find what works best for you.
I’ve heard that you can sew buttons using dental floss instead of thread. Has anyone tried that?
Yes, using dental floss to sew buttons is actually a common alternative. Dental floss is strong and durable, making it a great option for sewing buttons that need to withstand a lot of stress. Just make sure to use an unflavored dental floss, as flavored floss may leave a residue on the fabric.