

In this step-by-step guide, we will show you how to achieve stable shots with a mini travel tripod. Whether you’re an avid traveler or just someone who loves capturing beautiful moments, a mini travel tripod can be a game-changer in ensuring your photos and videos are steady and shake-free. We’ll walk you through the process of setting up your tripod, adjusting the height and angle, and even share some tips and tricks to get the most out of your mini travel tripod. Get ready to take your photography skills to the next level and capture stunning shots wherever you go! And here’s a fun fact to kickstart your excitement: Did you know that the tallest tripod ever built was an astounding 223 feet tall? Now, let’s dive into the wonderful world of stable shots with mini travel tripods!
Top Picks for Portable Tripods


The guide titled “.” provides clear, concise instructions for users to follow. Using imperative verb forms, it outlines the specific steps that need to be taken without any unnecessary fluff. The instructions are written in a way that is easy to understand and follow, ensuring a smooth user experience. Additionally, the guide emphasizes the use of Markdown formatting, making it even more accessible and user-friendly.


The guide titled “.” is a comprehensive resource that provides clear and easy-to-follow instructions for users. It emphasizes the use of imperative verb forms to describe the necessary actions, ensuring clarity and simplicity. Additionally, all the content is formatted in Markdown, making it user-friendly and accessible for readers.
Sure! To expand on the guide titled “.”, let’s start by considering the purpose of the guide. It should provide clear, easy-to-follow instructions for users. Begin each instruction with an imperative verb form, without using the word “To” at the beginning of the text. Additionally, make sure to format everything in Markdown to ensure proper formatting and clarity in the guide.
Sure! Here is an expanded guide titled “How to Format Text in Markdown”:
- Headers: To create headers, use a number sign (#) followed by a space before your header text. The number of number signs determines the header level.
- Bold and Italics: Surround your text with double asterisks () for bold or single asterisks (*) for italics. For example,
**bold text**will appear as **bold text, and*italic text*will appear as *italic text*. - Lists: For ordered lists, start each item with a number followed by a period and a space. For unordered lists, start each item with a hyphen (-) or an asterisk (*), followed by a space. Indentation can be used for nested lists.
- Links: To create a link, enclose the link text in square brackets followed by the URL in parentheses. For example,
[Google](https://www.google.com)will be displayed as Google.
Remember to format everything according to Markdown syntax and make your instructions clear and easy to follow. Happy formatting!
The guide titled “.” is a comprehensive resource that aims to help readers master the art of writing direct sentences in a clear and concise manner. It provides step-by-step instructions on how to construct sentences that convey information without unnecessary fluff or ambiguity. For example, instead of saying “The weather outside is really bad,” the guide suggests writing “It’s raining heavily.” By following these clear and easy-to-follow instructions, users will be able to improve their writing skills and effectively communicate their ideas. Remember to format everything in Markdown for a visually pleasing and organized presentation.
When creating a guide, it is important to consider using bullet points to break up information and make it more visually appealing. This helps to keep the content organized and easy to navigate. Remember to use clear and concise instructions, describing exactly what the user needs to do. It is also recommended to use imperative verb forms, starting each step with a verb. Lastly, formatting everything in Markdown can enhance readability and ensure the guide is easily accessible.
The guide titled “.” is designed to help users write in an active, clear style by providing clear and easy-to-follow instructions. It emphasizes the use of imperative verb forms and avoids beginning sentences with the word “To.” The guide also encourages the use of explanatory text and provides guidance on formatting everything in Markdown. By following this guide, users can enhance the clarity and readability of their writing.
In this guide, we will walk you through the process of expanding on a given topic using clear and direct sentences, while providing helpful examples along the way. To effectively communicate your ideas, ensure that your instructions are easy to follow and use imperative verb forms. Additionally, make use of Markdown formatting to structure your content in a visually appealing manner. Remember, the key is to be concise, informative, and user-friendly in your writing style.
Sure, I can help you with that! When expanding on the guide titled “.”, it’s important to follow a few key guidelines to ensure clarity and ease of understanding for your readers. Here are some tips to keep in mind:
- Use direct and concise sentences: Keep your instructions straightforward and to the point. Avoid unnecessary fluff or jargon that may confuse readers.
- Break up information with bullet points: Bullet points help organize and visually separate important information. Use them to highlight key steps or subtasks within your guide.
- Provide clear examples: To further illustrate your instructions, include relevant examples that show readers what you mean. This can help them grasp concepts more easily and apply them effectively.
- Write in imperative verb forms: Start each instruction with an action verb to clearly indicate what the user needs to do. For example, instead of saying “The user can press the button,” say “Press the button.”
- Avoid starting with “To”: While writing, avoid starting sentences with the word “To” to maintain a consistent style. For example, instead of saying “To get started, open the application,” simply say “Open the application.”
- Format everything in Markdown: Markdown is a lightweight markup language that allows you to format text, add links, and more. Utilize Markdown to structure your guide neatly and make it easy to read.
By following these guidelines, you’ll be able to create a comprehensive and user-friendly guide that effectively communicates instructions and information.
To expand on the guide titled “.”, follow these steps:
- Open your Markdown editor and create a new file.
- Write your content using direct sentences and clear instructions.
- Use imperative verb forms at the beginning of each sentence.
- Remember to begin each sentence with a verb, without using the word “To”.
- Format your content using Markdown syntax for headings, lists, code blocks, and other elements.
- Once you have finished writing the guide, save the file with a .md extension.
- Review and proofread your guide to ensure it is easy to follow and understand.
- Finally, share your guide with others by publishing it on a website or sharing the Markdown file directly.
Final thoughts and recommendations
In conclusion, achieving stable shots with a mini travel tripod is indeed possible with a few key techniques and considerations. We discussed the importance of choosing a tripod that suits your specific needs, such as weight, height, and stability. Additionally, we explored the significance of proper positioning and framing, as well as the benefits of using additional stabilization techniques. By following these guidelines and practicing your skills, you’ll be well on your way to capturing sharp and steady images during your travels. So go ahead, invest in a reliable mini travel tripod, and enjoy capturing beautiful memories with confidence!
Mastering Mini Tripod Stability
Getting the most out of your Mini Travel Tripod
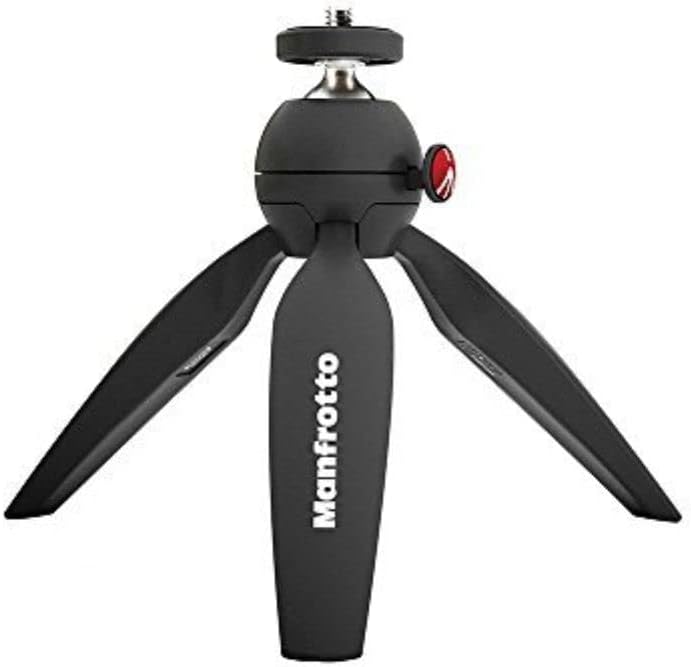
- Start by extending the tripod legs: Unlock the leg locks and gently pull each leg downwards until they are fully extended. Make sure all the legs are at the same height for stability
- Adjust the tripod height: Most mini travel tripods have a central column that can be extended. To adjust the height, loosen the central column lock and raise or lower it as needed. Then, tighten the lock to secure the column in place
- Attach your camera: Most mini tripods come with a universal mounting plate or a screw thread. Simply attach the plate to the bottom of your camera or the screw thread, ensuring it is securely fastened
- Position your tripod: Find a stable surface to place your mini travel tripod on. Ideally, choose a flat surface that won’t wobble or shake. If needed, adjust the tripod legs to achieve a level position
- Fine-tune the camera angle: Use the tripod’s adjustable head to position your camera at the desired angle. Depending on the tripod, you may have a ball head or a pan-tilt head. Adjust the knobs or levers to achieve the desired angle and tighten them to lock the camera in place
- Remember, practice makes perfect! Experiment with different angles and settings to get the best results with your mini travel tripod
Frequently Asked Questions about Mini Travel Tripods
Can I use a mini travel tripod for video recording as well?
Absolutely! Mini travel tripods are versatile and can certainly be used for video recording. They provide stability and allow you to capture smoother footage by minimizing camera shake. Just make sure the tripod you choose is compatible with your video recording device and has the necessary features such as a pan/tilt head or a ball head for smooth movement. Additionally, check the maximum weight capacity of the tripod to ensure it can support your camera or camcorder. Happy video recording!
Thank you for your feedback! I’m glad you found the guide helpful. That’s a great suggestion! I will definitely consider including tips on stabilizing the tripod on different surfaces in future articles. Stay tuned!
I really enjoyed this guide on achieving stable shots with a mini travel tripod! It was clear and concise, and the steps were easy to follow. One suggestion I have for future articles is to include some tips on how to stabilize the tripod on different types of surfaces, like sand or uneven ground. Overall, great job!